You might have seen in several websites and blogs, those ads that is floating or sticky to the bottom of every page. These ads are responsive in design and appear for both mobile and desktop devices. This can be easily added if you use a CMS (Content Management System) like WordPress or know how to code. But that is not the case for the ones using Google Blogger. As it comes without much widget/plugins support, you have to do almost everything alone. This can be difficult if you are new to this field or don’t know how to code.
So, in this post I will let you know how to add sticky floating bottom ads to your Blogger website. This will also allow users to click the cross button to close the Ad if needed. Learn how to add a responsive contact form for Blogger.
Table of Contents
What is a Sticky Bottom Floating Ad?
A sticky bottom floating Ad is that ad seen at the footer/bottom of web pages which never moves when page is scrolled. These ads are seen on both mobile and desktop devices. Also, the visitor can close this ad by clicking on the cross sign. This Ad that floats at the bottom of a web page is also known as Anchor Ads.
Why you should add a sticky bottom Ad to your Website?
There are several reasons that publishers choose this Ad layout. As you may already know, sticky and floating bottom ads generate more income than most of the other ads. This type of ad is usually used on sites with a lot of traffic. The main benefit is that you can replace those less revenue generating ads with this one and improve page speed for your site. The ‘Page Experience’ algorithm update from Google makes page speed an important factor in SEO. Using a lot of ads can affect page experience, i.e., pages will take longer to load and there is chance for CLS (Cumulative Layout Shifts).
So, by using sticky bottom ads you can benefit in terms of SEO without affecting revenue generation. This can also benefit you if you use third-party ad platforms like Ezoic and MonetizeMore. If a user stays for long on a web page, your income might increase.
See more Blogging tips.
What are the benefits of using sticky Ads?
Using sticky Ads gives you a lot of advantages. Some of them are:
- High CTR (Click-Through-Rate) and CPM (Cost per Mile) rates compared to other display Ads.
- Improved page speed.
- According to experts, sticky Ads generate more revenue when integrated with third-party Ad providers like Ezoic.
- Improved page experience due to less CLS.
Before you begin the process, please consider taking a backup of your Blog to avoid loss of data and files.
How to Backup a Blogger blog
- Open your blog and go to ‘Settings‘.
- Click on the drop-down near the ‘Customise‘ button.
- Choose ‘Backup‘ and then click ‘Download‘.
- Your blog will be now saved into device storage.
How to add Sticky Floating Bottom Ads in Blogger
Now let us check out how to add responsive sticky and floating bottom ads to your Blogger or Blogspot website.
Step 1: Open your blog and go to ‘Settings‘.
Step 2: Click on the drop down arrow near to ‘Customise‘ button and then click on ‘Edit HTML‘.
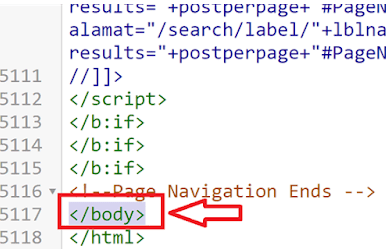
Step 3: Find the </body> tag.
Now use Ctrl+A to select the full code. Then use Ctrl+F and search for </body> tag in the theme HTML.

Step 4: Copy the CSS code below and paste it just above the </body> tag.
Step 5: Now go to Google AdSense and a create a new Display Ad or copy an existing ad code.
Step 6: Paste the AdSense ad code in the code you applied just above the </body> tag.
(Replace the <—-Enter Ads Code—-> line with your AdSense code).
Step 7: Save theme.
Click on the ‘Save’ icon to save the changes. Now you have successfully placed your bottom sticky floating Ad.
If you have any doubt regarding the setup, you can ask them via comments.
FAQ
You can stick any type of display Ads in a website.But horizontal and vertical Ads are most preferred.
According to high traffic site owners, sticky Ads generate more revenue than most of the other Ads.
Yes, if your sticky Ad is responsive, it will appear on both mobile and desktop devices.
In Blogger, you cannot use a plugin or widget to add a sticky Ad or floating Ad. You have to insert custom codes into the theme HTML. But in WordPress, you have a number of plugins for this function. You can add a sticky ad to footer or sidebar.
Yes, you can add floating Ads to right and left sides of your website by placing related code.

